
StaticPulse
-
Content Count
536 -
Joined
-
Last visited
-
Days Won
22
Everything posted by StaticPulse
-
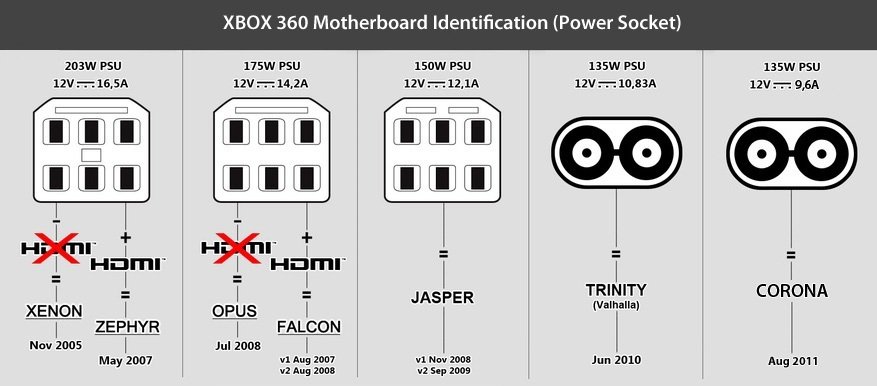
Here's the section on the LPT dump method. This is the cheapest but longest method. You are going to need the following: (5x) 100 ohm 1/2W Resistors 1N914/4148 Switching Diode 25-Position Male D-Sub Connector 25-Position D-Sub Connector Hood (not needed but keeps it clean and safe from shorts external shorts) Wire (from material list) A computer with the old school 25pin purple printer/LPT port The 25pin Male D-Sub Connector has a side with pins recessed and a side with pins that stick out and have holes. The following picture shows the side with holes, and on this side you are going to solder 1 of the 100K ohm 1/2W resistors to pink, light blue, yellow, blue, and red (direction does not mater). Then you are going to solder a wire from each of the points/resistors ends (for the points that now have resistors) on the 25pin plug to their corresponding colors (just match them with the ones on the board), EXCEPT that the wire coming the the orange point will have the 1N914/4148 Switching Diode on it. The diode has a black line on it that is slightly closer to one side, and that side is the one that MUST be soldered to the motherboard, while the other side will be soldered to the wire coming from the orange point on the 25pin plug. Keep the wires as short as you can while still having enough length to reach from the Xbox to your computers port without putting too much tension on the wires. Now that you have done this, you simply need plug the 25pin plug into your computer (while having your Xbox resting on some surface), and then plug in your Xbox's power brick but DO NOT turn the console on. Then download the following: -Nandpro V3.0a: http://dwl.xbox-scene.com/xbox360pc/nandtools/Nandpro30.rar -If you have a 64bit system you also need this: http://www.highrez.co.uk/scripts/download.asp?package=InpOutBinaries Extract Nandpro into a folder (called Nandpro30) on your desktop (you need WinRAR/7zip to do this) and if you have a 64bit OS extract InpOutx64.dll from the 2nd file into that folder as well, and if you have a 32bit OS once you extract the folder you must run port95.exe and install it. Then open a command prompt by searching (Windows 7/Vista) for "cmd" it or going to Run (All Windows) and entering "cmd". Then you are going to type "cd desktop\Nandpro30" and press enter, and then run this command: Code (Text): nandpro lpt: -rX nand.bin where X is based on your console. If you have a Xenon, Zephyr, Opus, Falcon, Jasper, Trinity, or Corona V1 then X=16 If you have a Jasper BB 256MB or 512MB then X=64 (this can take a VERY long time for BB Jaspers) In the end you will end up with something like this: Now simply press enter and it should start reading, which you can see by the the 4digit alphanumeric code at the bottom that starts at 0000 and will slowly go up by 1. Once it reaches 03FF (more for BB Jaspers) it will stop and show another command line. If it didn't work then 1)You didn't run port95 or copy in InpOutx64.dll or 2) You didn't solder correctly or 3) Your Xbox's power isn't plugged in Now you are going to run the command again except instead of "nand.bin" at the end you are going to have "nand2.bin". This is to get 2 dumps and compare them to make sure they match, which guarantees that it is correct (lots of waiting for Jasper BBs). Now open J-runner and click the "..." next to "source file" and select nand.bin and for the "..." next to "additional file" select nand2.bin (these are both in the nandpro30 folder). It should tell you it is an exact match in the log. If not keep dumping until you get two that match and once you get a pair that matches backup one of them somewhere as "Orig_NAND.bin" and keep it safe. Then rename the other matching dump to nanddump1.bin and move it to the "output" folder within the "J-Runner" folder that is on your desktop. Then open J-Runner and click the "..." next to "Source File" and open the nanddump1.bin you just moved. Keep your Xbox plugged into your computer and it's power, and keep J-Runner open but close Nandpro. Then move on to Part 2a if you are using the JTAG method or Part 2b if you are using the RGH method.
-
The diode trick works perfectly for Xenons. I've done it now with two. Getting a NAND dump via LPT cable check that guide, buying a jr programmer is worth it if you cant find a NAND-X,
-
Step 2a: JTAG Now if you are on exactly dash 7371 (and therefore trying to JTAG) it is time to find out if you Xbox is JTAG'able. If this doesn't apply to you skip this. In J-Runner (it should still be open with your motherboard type selected and your NAND dump selected under "Source File") look over the the middle right and check out in the "Nand Info" section where is says "2BL [CB]". Look at what your CB is and see if it is in this list: -Xenon: 1922, 1923, 1940, 7373 -Zephyr: 4571, 4572, 4578, 4579, 4580 -Falcon/Opus: 5771 -Jasper: 6750 If your CB is on this list it is patched and not JTAG'able. If it is not on this list you are good to go. Checklist: Your here because you found in the flow chart that your exploit method is the JTAG method (dash is 7371 or less and console is a phat) You have Orig.bin NAND dump backed up Your CB is not on the list of patched CBs There are three main ways to JTAG your console: 1. The Xenon Method (only for Xenon consoles) 2. The Boxxdr Method (Zephyrs, Opus, Falcon, and Jasper) 3. The Boxxdr Method plus DVD Tray (Zephyrs, Opus, Falcon, and Jasper) There are more variations of these methods but these are the only ones you need to care about as the Boxxdr method is the most stable. If you have a Xenon motherboard you do its one and only method, if you have any other motherboard you do the 2nd method (Boxxdr). In general the default method should work for you so go for it, but some consoles will rarely require the Boxxdr Method plus the DVD tray point. So if you get to the part with booting Xell and the console doesn't boot, you frequently get E79's, or you have problems with HDMI and really want it come back here and check out the 3rd method. Method 1 (Xenon): What you need: Wire (from materials list) (2x)1N914/4148 Switching Diode In J-Runner (it should still be open with your motherboard type selected and your NAND dump selected under "Source File") in the upper right section titled "XeBuildOptions" click the drop down and select "Add Dash". In the window that appears check off "16747" and click "Add Dashes". Then in the same drop down select "16747" as it will now be in the list, and then select "JTAG" so it's bubble is filled. Now back in the upper left click "Create Xell-Reloaded". The log should say "Xell File Created Successfully xenon.bin". Now follow which one applies to you: A) You used the LPT method to dump your NAND You used the NAND-X/J-R Programmer method you dump your NAND A) Keep J-Runner open, and copy the xenon.bin file from the output folder in the J-Runner folder on your desktop into the Nandpro30 folder. The open a Command Prompt again ("cmd") and type "cd desktop\Nandpro30" and press enter, and then type in this command: Code (Text): nandpro lpt: -w16 xenon.bin You will end up with something like this: Now simply press enter and it should start writing, which you can see by the the 4digit alphanumeric code at the bottom that starts at 0000 and will slowly go up by 1. Once it reaches 004F (more for BB Jaspers) it will stop and show another command line. If it didn't work then 1)Check your soldering or 2) Your Xbox's power isn't plugged in Now that this is done you can close Nandpro and remove your LPT plug from your computer and your Xbox. We won't be needing it any longer. Also, unplug the Xbox's power. ---END OF A--- In J-Runner click "Write Xell Reloaded" and you should see it start writing in the log. If not then make sure your NAND-X/J-R Programmer is still connected to your computer and the motherboard and the Xbox's power is plugged in. When it reaches 03FF it will complete. Now that this is done you can disconnect the NAND-X/J-R Programmer from your computer and your Xbox. Also, unplug the Xbox's power. --END OF B-- Now use this diagram to solder the actual JTAG wires: The red line is a simple jumper wire while the yellow and blue are bridging wires with one switching diode each. For both the blue and yellow wires, the end of the diode that has the black line closer to it MUST be soldered to the motherboard by J1F1, while the wire is soldered to the other end of the diode and then to its respective point by J2D2. Once this is done, put your Xbox back to together to the point where the motherboard is in the metal shell, the fans are in and the fan shroud is on, and the front Ring of Light board is plugged in. Then move on to Step 3.
-
This should help you out From Se7enSins http://www.se7ensins.com/forums/threads/jtag-rgh-r-jtag-xbox-360-ultimate-exploit-guide.804054/
-
sadness..... cross your fingers for bops3
-
I've always referred to it as that as anytime I've ever messed with the partitioning it was on Linux. And I am fully aware that MSDOS is Microsoft DOS, I did learn x86 hardware with DOS 3.1 back in the day when all I had was a 386 sx 33mhz and a 20 meg hard drive with xtree gold....
-
http://askubuntu.com/questions/405735/installing-multiple-linux-distros-in-a-single-partition One way to find out if you have an "msdos" partition table or another, less limiting, type of partition table is to just try creating a fifth partition (without making it inside an extended partition--extended partitions are generally not possible except with an "msdos" partition table). Another way is to check directly in GParted. To do this, click View > Device Information. A *Device Information pane will appear to the left of the list of partitions, under the horizontal representation of the disk. In contrast, if you have a GPT disk, you'll see "gpt" instead of "msdos." (There are other types of partition table as well, GPT and "msdos" are just the most likely, on a PC.) Note that, while it is possible to turn a disk with an "msdos" partition table into a GPT disk in GParted (with Device > Create Partition Table...), doing so will "erase" all data on the disk! (That's why I haven't recommend that, as a solution to your problem.) ###AND VICE VERSA### Since you can edit the partition table in Gparted, it will allow you to delete the table from GPT and re-create it as msdos. ( If that makes sense) I find that msdos partition tabled drives with FAT32 partitions to be the least problematic for any external device or enclosure unit.
-
This is a workhorse enclosure unit that I use that works with no issue http://www.amazon.com/AcomData-PATA-IDE-Enclosure-Radiant-SMBXXXU2E-RD/dp/B000VNJD1S. Also, did you check the partition table of the hard drive itself to make sure its MSDOS FAT32 partition table and not GPT?
-
 This is one of the best skins I've seen so far! GREAT WORK!!!
 -
me either I did have to chuckle at that one though.
-
ouch
-
[Aurora] New Ideas For Aurora/LiNK
StaticPulse replied to HowlingWolfe93's topic in Requests and Suggestions
If his only connection is wifi and he wants a faster and more reliable wifi connection, a wiMAX would definitely suit his needs. I have a few friends who use one when they're in hotels and the hotel network service just plain sucks. Also, most hotels don't have keystone jacks in the rooms these days and defer to wireless service for their guests. If he had the keystone panel to connect his console, he wouldn't need a network bridge in the first place... -
[Aurora] New Ideas For Aurora/LiNK
StaticPulse replied to HowlingWolfe93's topic in Requests and Suggestions
Maybe make a network bridge out of a wiMAX card and the ethernet port on your laptop when you're abroad and just using a crossover cable to connect the xbox to your laptop that is wiMAX connected? -
When it cuts into your total available bandwidth, that's pretty bad, just sayin........... I think I might just migrate back to Debian or CentOS after all this stupidity. I don't game much so really there's no point to it for me to have it... I'm wondering what wonderful bugs will reveal themselves despite the open beta testing that took place. Lots of new Secuirty holes with all that targetted advertising crap and the whole peer2peer updating system. I see fun with Wind0ze Portz in the future lawlz!!! =p
-
So far from what I'm seeing and reading, Windows 10 seems to be just a big piece of data mining malware. Maybe a version will be leaked that has had all the offensive services removed and/or circumvented. Wow thats messed up, the warez version of this Operating System is probably cleaner than the official one....
-
You can get 8.1 upgrade free from the microsoft store
-
Aurora Fakeanime boot video
StaticPulse replied to moses_373's topic in Skins, Coverflow Layouts, Scripts and Trainers
I'm definitely putting this into my collection THANKS!!!! -
Another thing people need to be on the watch out for with Windows 10, It uses your bandwidth to deliver updates in a torrent style fashion..... How "Cool" is that? Thanks to Bob Dobalina for sharing this post via my Facebook, I thought I'd extend the courtesy since I know you guys probably don't want this feature enabled either.... So go: start // Settings // Updates // Advanced Options // Choose how updates are delivered // Turn updates from more than one place OFF Swizzy, this may be why you were having hot spot issues, the updater can push updates to all other windows 10 computers on a locally connected network.... o.0 http://thehackernews.com/2015/08/windows-10-update.html
-
No power supply but I went over to Modesto with my buddy to go get it. I wound up trading my buddy a JTAG Xenon, clean Jasper and Slim Trinity for it. I probably overpaid on the trade but its not everyday that you can say you got a devkit. I'm going to tinker with it and see what all it can do. Will post some pics of it later And yes, the side car came with it, its not an upgraded one, first thing I'm going to do is backup the NAND and anything on it to make sure I keep all the OEM stuff intact.
-
So its totally worth the money then?
-
Anyone have any use for one? My buddy in Stockton just came across one for sale for $130
-
As I said earlier, I put it on this laptop as a test, and so far I'm really not impressed at all with Microshaft.... The targeted ads are understandable but the hard disk scanning for illegal content? What the fuck (excuse the language) happened to personal property and intellectual property rights? Honestly this is complete bullshit on their part in my opinion. The fact that you have to login to live and browse to a webpage to disable two advert features from the computer, seriously.... really??? I have to go online and login to a live account to opt out of an invasion of my privacy?? wow....... Not to mention that everyone's hardware ID's have now been logged into a huge database Makes me wish I'd done the install on a VM instead of my main on this laptop. I'm not too worried if it bothers me enough I'll backup my archival media and do a clean install after a complete drive wipe. As always, M$ has left a very bad taste in my mouth... Shiny, Looks neat, don't get me wrong, but damn.... the whole world bent over at the waist for this one brother...... xD
-
Anyone concerned about their privacy settings should read this. http://bgr.com/2015/07/31/windows-10-upgrade-spying-how-to-opt-out/\ And this http://www.rockpapershotgun.com/2015/07/30/windows-10-privacy-settings/
-
If I remember correctly, didn't Gavin say something awhile ago about NOVA being brought down from the Transport layer to the Data Link Layer so that some of these issues won't be issues anymore?
